External Hard Drive is not Detected in macOS, Fix it Now!
External hard drives or other USB drives are connected to a computer, either a Windows PC or an Apple Mac, through a USB port. Then the computer will detect the external disk and mount it for use. The whole process should be easy. However, you may find your external hard drive isn’t showing up on Mac’s desktop after it is connected.
Why the Mac doesn’t detect your external hard drive? The reasons may vary from case to case and could include but not limited to file system incompatibility, corrupted partition, misconfiguration of Mac’s preferences, and hardware issues.
We will troubleshoot the issue and keep the files safe at the same time.
Do the basics
Those steps are common sense but many people didn’t pay much attention to them.
- Check the USB port/hub/adapter. Check if the USB port through which you connect the external hard disk is clean and dry. If you are using a hub or adapter, try to connect the external hard drive directly to the Mac.
- Make sure the power is on. Most external hard drives receive power over USB cord while some of them need separate power resource. Make sure they have power and the light (if it has) is on.
- Connect the drive to the end of the port. Give the USB cord another push to make sure it connected to the computer firmly.
- Restart the Mac. Sometimes the Mac would believe that the USB port is still occupied especially after you didn’t safely eject an external hard drive before. Rebooting the Mac will release the USB port for your external hard drive.
After those basic fixes, do you see the USB hard drive show up on Mac? If you are still shaking your head, keep reading to find more fixes below.
How to make the external hard drive detected?
First you need to calm down. Undetected external HD doesn’t mean that it is definitely dead. Try the following fixes in order.
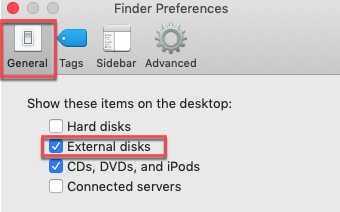
- Verify Mac’s settings
You can’t see the external hard drive on Mac’s desktop because Mac’s settings is hiding it. To show up the icon of the portable HD is easy.
Step 1: Click Finder besides the Apple logo in the top menu bar.
Step 2: Select Preferences in the context.
Step 3: Go to General tab and tick the box in front of External disks.
- Check the status of the external hard drive in Disk Utility
Disk Utility is a built-in app in macOS that is used to manage internal and external disks. If an attached disk is not showing up on desktop after you change the settings, check the status of the external physical drive is another way. If the drive even doesn’t show up in Disk Utility, it is very likely that your hard disk was physically damaged and can’t be fixed by yourself.
However, if the Disk utility shows up the external HD but it greys out in the left column, it means the macOS has trouble mounting it. As a result, it won’t show up on the desktop and you might believe it is not detected. The reasons and according solutions are listed below:
- File system incompatibility – some file systems such as NTFS and EXT are not friendly to macOS, so external disks formatted with those file systems may not be mounted successfully because the macOS doesn’t recognize the external HD. You can format the external hard drive in Disk Utility.
- Encrypted external hard drive – if the external HD is encrypted by a third-party app, the macOS may be unable to mount it before it is decrypted. Go find the relevant software to decrypt the drive.
- Corrupted external hard drive – the damages to the partition table, file system or root directory of the external hard drive may prevent it from mounting. Run First Aid to fix the errors or format it to assign a new file system.
Disclaimer: Formatting the external hard drive may cause data loss. You need to get the files off the external hard disk first if you don’t have backups.
Conclusion
When your external hard drive can’t be detected in macOS, it doesn’t mean your disk stops working completely. Hopefully, the solutions mentioned above can help solve the undetected external hard drive issue.